


| |
Expand the database folder that you extracted in the previous section. Double-click setup.

2. Click Yes in the User Account Control window to continue with the installation.

- The Configure Security Updates window appears. Enter your email address and My Oracle Support password to receive security issue notifications via email. If you do not wish to receive notifications via email, deselect “I wish to receive security updates via My Oracle Support”. Click Next to continue. Click “Yes” in the confirmation window to confirm your preference.


4. The Download Software Updates window appears with the following options:
- Select “Use My Oracle Support credentials for download” to download and apply the latest software updates.
- Select “Use pre-downloaded software updates” to apply software updates that you previously downloaded.
- Select “Skip software updates” if do not want to apply any updates.
Accept the default and click Next.

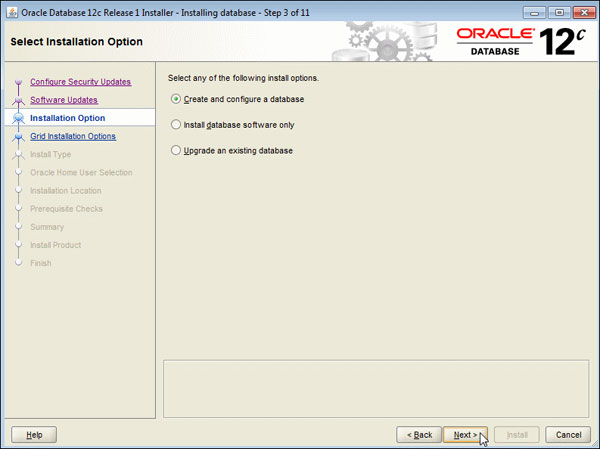
5. TheSelect Installation Optionwindow appears with the following options:
- Select “Create and configure a database” to install the database, create a database instance, and configure the database.
- Select “Install database software only” to only install the database software.
- Select “Upgrade an existing database” to upgrade the database that is already installed.
In this OBE, we create and configure the database. Select theCreate and configure a databaseoption and clickNext.
6. TheSystem Classwindow appears. Select Desktop Class or Server Class depending on the type of system you are
using. In this OBE, we will perform the installation on a desktop/laptop. SelectDesktop classand clickNext.

7. The Oracle Home User Selection window appears. Starting with Oracle Database 12c Release 1 (12.1), Oracle Database on Microsoft Windows supports the use of an Oracle Home User, specified at the time of installation. This Oracle Home User is used to run the Windows services for an Oracle Home and is similar to the Oracle User on Oracle Database on Linux. This user is associated with an Oracle Home and cannot be changed to a different user post-installation.
Note:
- Different Oracle homes on a system can share the same Oracle Home User or use different Oracle Home Users.
- The Oracle Home User is different from an Oracle Installation User. The Oracle Installation User is the user who requires administrative privileges to install Oracle products. The Oracle Home User is used to run the Windows services for the Oracle Home.
Thewindow provides the following options:
- If you select “Use Existing Windows User”, the user credentials provided must be a standard Windows user account (not an administrator).
- If this is a single instance database installation, the user can be a local user, a domain user, or a managed services account.
- If this is an Oracle RAC database installation, the existing user must be a Windows domain user. The Oracle installer will display an error if this user has administrator privileges.
- If this is a single instance database installation, the user can be a local user, a domain user, or a managed services account.
- If you select “Create New Windows User”, the Oracle installer will create a new standard Windows user account. This user will be assigned as the Oracle Home User. Please note that this user will not have login privileges. This option is not available for an Oracle RAC Database installation.
- If you select “Use Windows Built-in Account”, the system uses the Windows Built-in account as the Oracle Home User.
Select theCreate New Windows Useroption. Enter the username asOracleHomeUser1and password as
Welcome1. ClickNext.
Note:Remember the Windows User password. It will be required later to administer or manage database services.

8. TheTypical Install Configurationwindow appears. Click on a text field and then the balloon icon ( )to know
 )to know
more about the field. Note that by default, the installer creates a container database along with a pluggable database
called “pdborcl“. The pluggable database contains the sampleHRschema. Change the Global database name toorcl.
Enter the “Administrative password” asOracle_1. This password will be used later to log into administrator accounts
such asSYSandSYSTEM. ClickNext

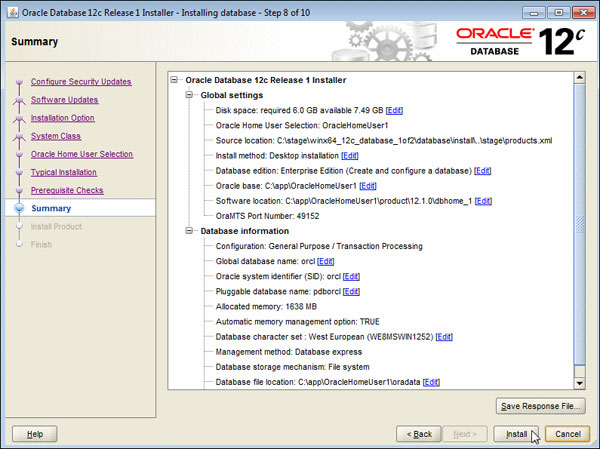
9. The prerequisite checks are performed and a Summary window appears. Review the settings and click Install.
Note: Depending on your firewall settings, you may need to grant permissions to allow java to access the network.
10. The progress window appears.

11. The Database Configuration Assistant creates the database.

12. After the Database Configuration Assistant creates the database, you can navigate tohttps://localhost:5500/em as
a SYS user to manage the database using Enterprise Manager Database Express. You can click “Password
Management…” to unlock accounts. Click OK to continue.

13. The Finish window appears. Click Close to exit the Oracle Universal Installer.